


Showing posts with label how to. Show all posts
Showing posts with label how to. Show all posts
Backgrounds, Backgrounds, Backgrounds!
Well up in here in good ole Saskatchewan, Canada in the winter, the temperature can drop below minus 40 C, which basically means there is no well in hell, I'm going outside to take pictures. So a good indoor light setup is essential! I've been playing around with my lightbox now that it's setup properly and I got to thinking about how much I hate white backgrounds (mostly because I don't do them particularly well)!
So I've been wandering around for the last month or so, collecting backgrounds for my photographs. Here are some of the items I came up with:


Scrapbook Paper! This was a total fluke because I don't scrapbook at all! I just happen to wander down that particular aisle at Michaels and EPIPHANY! It comes in a huge variety of designs and colors.
- Advice: Choose a couple of papers that best reflect your work, and stick with them, it will make your work more recognizable!.


My dad found this rock while he was camping a couple of years ago, it has a gorgeous orange and black coloring to it. I found it in their garden the other day (and sort of swiped it), so that I could see how it did as a background.

I found this piece of wood in my parent's back yard in their tree line. I didn't really think much about it but when I used as a background, it adds a real nice, rustic texture to the photo.


I picked up the piece below at a dollar store for $1.25. It doesn't really look like much when I first picked it up BUT the way it's shaped, it's profile is a perfect, inexpensive mimic of a person's bust. Which will save you $25+ on buying a true jewelry display bust!
Other backgrounds ideas:
- Ceramic tiles (not the shiny ones, they'll leave a glare in the photo
- Small sheet of brushed steel
- Rusty iron (think farm implements)
- Small pile of mulch (could be messy)
- A roof shingle
- etc, etc, etc, etc, etc.....
There are literally thousands upon thousands of different background display ideas. You just need to keep your eyes open for anything that seems unique or different. Even if it doesn't look good at the time, it doesn't hurt to bring it home and try it!


Offering a coupon or gift certificate on Etsy

A great way to encourage repeat business is through exclusive sales to current customers, event attendees, etc. Unfortunately, Etsy isn't setup to automatically to calculate a discount. So, what do you do?
Option 1:
1.) Give your customer a predetermined code or message (something that you'll remember).
2.) Let them know that they'll need to add it the "Message to Seller" section during checkout.
3.) You can either send them a revised invoice or refund the difference via Paypal.
- When refunding via Paypal, remember to use the "Refund" button at the bottom of the transaction page, otherwise the customer will be charged for accepting the refund.
- When refunding via Paypal, remember to use the "Refund" button at the bottom of the transaction page, otherwise the customer will be charged for accepting the refund.
Option 2:
1.) Have the customer convo you before they purchase, this allows you to adjust the price of the listing for the customer beforehand.
You can also add gift certificates to your shop for current and new customers.
- Remember to add a line in the description, that the gift certificate is accepted in your shop (and not for the entire Etsy site).
Well, I came across a few people with a few questions and I hope I cleared everything up. If anyone has any suggestions or questions, please let me know!
Creating a Twitter Background out of your Etsy Mini
I created this tutorial to walk you through creating an Etsy mini that can be added to your Twitter background!
If you have any problems, or have any questions, please feel free to ask!
1.) Click on “Your Etsy” at the top of the screen.
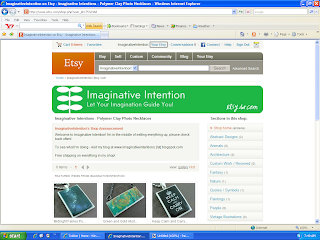
6.) Open Twitter. Select “Settings” at the top of the page.
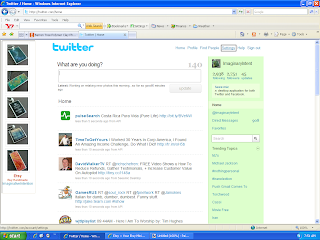
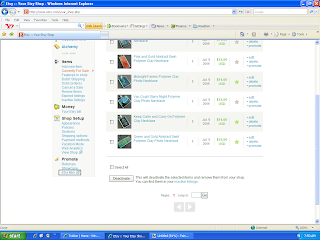
2.) Scroll down to the bottom of the page, and click on “Etsy Mini”.
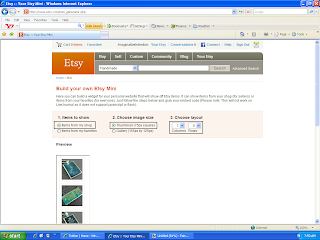
3.)
- Under “Items to Show” – select “Items from my shop”.
- Under “Choose Image Size” – select “Thumbnail (75px square)”
- Under “Items to Show” – select “Items from my shop”.
- Under “Choose Image Size” – select “Thumbnail (75px square)”
- Under “Choose Layout” – select “1” and “5”
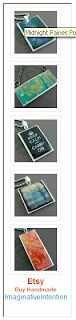
4.) Scroll down, your Etsy mini should appear underneath the option selection section. Make sure you can see your entire Etsy mini on screen. Using your keyboard, select Ctrl + Print Screen. You have just copied the entire screen.
5.) Open your image editing software program. Hit Paste. Your Etsy mini should appear on screen. Crop the image. Save the image.
6.) Open Twitter. Select “Settings” at the top of the page.
7.) Select “Design”.

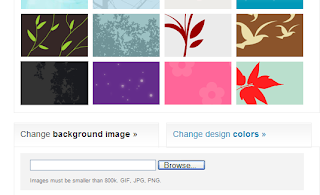
8.) Choose “Change Background Image”.
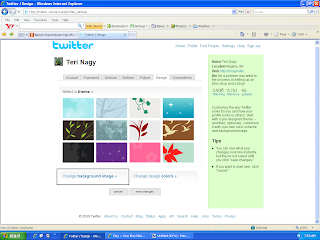
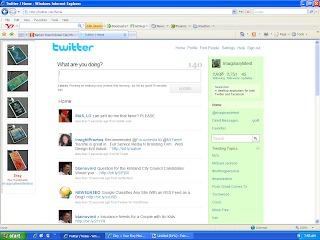 11.) VIOLA! You should have a new Twitter background of your Etsy images.
8.) Choose “Change Background Image”.
9.) Select “Browse”. Choose your Etsy mini image that you just saved. Select open.
10.) Select “Save Changes”.
11.) VIOLA! You should have a new Twitter background of your Etsy images.
Etsy Confession: Advice of the Day
So I have 2 years of Etsy selling experience and I was thinking of some of the mistakes I made in the beginning. I figured I should pass along some of the my "mistakes" in the hopes of helping others to avoid those mistakes.
1.) DON'T list your products on Etsy all at one time!
Why:
When your item is added to your Etsy shop, it ends up at the top of the search for a few minutes and then disappears into the search pages. Those first few minutes that your item is up there, it will be in the first few items the buyer sees. If you list a few times each day, different buyers will see your items at different times. Increasing your exposure and possiblity of selling.
2.) Always fill out your policies page!
Why:
If you have a problem with a buyer who disagrees with you about how something is supposed to be paid for, or how/when something is supposed to ship, you will need something to reference to show how and when that something is supposed to be done. Otherwise, you'll both be arguing over who is right without a good, standard solution. Especially when it comes to return policies.
3.) You can't just list your wares and sit back and wait for the sales to pour in, you need to do outside of Etsy promotion, here's a few suggestions:
a) Spend at least 1-2 hours in the forums about 6 days a week, reading and posting.
b) Started a blog and post almost every day.
c) Go to forums on other websites, google, yahoo, anywhere you can think of and post there making sure your store link is in your post (but don't just post to spam).
d) Get business cards and put them in all the packages you send to customers.
e) Start a flickr account.
f) Include in your packages to current customers, coupons offering discounts on future orders.
g) Make sure your store link is in every email you send.
h) Sign up for outside advertising (Project Wonderful, Google Ads, Facebook, etc)
i) Read other people's blogs and post messages on them, they will reply and notice your blog and sometimes post a link to yours.
j) Join an Etsy blog ring, so other people also find your blog
These are just a couple of things that I've thought about lately. I'll be adding more, as I think about it! I hope someone can use some of this to help themselves become more successful!
Reduce, Reuse, Upcycle!

So everyone who has kids and some who don’t have broken bits of crayons lying around and I know what you’re thinking, ‘I need to toss those out, they’re garbage’, right, NO! Using this tutorial and about 20 minutes of your time, you will be able take those little bits and make brand new crayons! It’s a great way to save few bucks and it’s good for the environment too!
Supplies:
Crayons
Old microwave safe glass cup
Mold
- I purchased the mold I used from Michaels for $3.95 (don’t forget your 40% off coupon - $1.75)
Optional:
Glitter
- You can stir glitter into the melted wax to add a little sparkle to your new crayons.
1.) Sort the crayons into piles (to match the colors you want to create). You can mix different colored crayons to create new colors.


3.) Place each pile of crayons into a separate microwave safe cup.

4.) Layout newspaper or paper towel. Place your molds on top of the paper, to catch any spills (terrible stuff to clean up).
5.) Place the cup into the microwave. Turn on high for 4 minutes.
6.) When you take the cup out of the microwave, swirl the cup or use a stir stick, a few times to mix the color together.

7.) Slowly pour the melted concoction into the prepared molds.
- Have paper towel handy, to clean up any spills.

8.) Leave and let harden for about 30 minutes. You can also stick the mold in the freezer for a few
minutes to speed up the process.

9.) After the wax has completely hardened, turn over molds and your new crayons should pop right out.
10.) Find paper and enjoy!
Note:
- Looking for cheap crayons? I bought a 1lb package of Crayola crayons for $1.99.
- Wondering what makes good molds?
- Soap molds, Candy molds, ice cube trays, muffin tins, etc
Supplies:
Crayons
Old microwave safe glass cup
Mold
- I purchased the mold I used from Michaels for $3.95 (don’t forget your 40% off coupon - $1.75)
Optional:
Glitter
- You can stir glitter into the melted wax to add a little sparkle to your new crayons.
1.) Sort the crayons into piles (to match the colors you want to create). You can mix different colored crayons to create new colors.
2.) Peel the wrappers off of the crayons.
- Soak the crayons in water for a few minutes and the wrappers will slide right off.
3.) Place each pile of crayons into a separate microwave safe cup.
4.) Layout newspaper or paper towel. Place your molds on top of the paper, to catch any spills (terrible stuff to clean up).
5.) Place the cup into the microwave. Turn on high for 4 minutes.
6.) When you take the cup out of the microwave, swirl the cup or use a stir stick, a few times to mix the color together.
7.) Slowly pour the melted concoction into the prepared molds.
- Have paper towel handy, to clean up any spills.
8.) Leave and let harden for about 30 minutes. You can also stick the mold in the freezer for a few
minutes to speed up the process.
9.) After the wax has completely hardened, turn over molds and your new crayons should pop right out.
10.) Find paper and enjoy!
Note:
- Looking for cheap crayons? I bought a 1lb package of Crayola crayons for $1.99.
- Wondering what makes good molds?
- Soap molds, Candy molds, ice cube trays, muffin tins, etc
Subscribe to:
Posts (Atom)


